Thursday, April 30, 2009

Relocating....hopefully

These posts might be few and far between for a little while. We are beginning the home buying process and it has proved to be STRESSFUL. On top of that, our rental house seems to be crumbling before our eyes! So obviously we're trying to get out of here asap. We thought we found the perfect house last weekend but we couldn't make a high enough offer and lost it. We were crushed but we've got a new list of homes to look at tomorrow. No matter where we end up Saetia has already told me she wants a pink floor, wall and ceiling...oh little girls, so precious.

In other news, my little sailor turned 1 on the 21st of April.


And this is Saetia waiting for the party to begin.

Thursday, April 23, 2009

Nature to Art Part 2

This activity is creating art with only things you've found outside. Go on a nature walk and collect things like rocks, leaves, moss, berries(make sure they don't eat any!), flowers, sticks, ect. *remember not to pick flowers or anyone's plants. We only collect things that have already fallen on the ground. So gather up your nature supplies and arrange them into anything you want. Use tacky glue and card stock. This art work will shrivel but you can display it for a couple of days. Saetia made a dragonfly. Other ideas are butterflies, turtle, fish, crab, ladybug or spider.

Nature to Art

Yesterday was Earth Day so we've been doing crafts with things we've found in nature or around the house. The first craft we did was a simple lady bug rock. Here's what you need:
*Go on a nature walk to collect flat round rocks
*red and black paint
*googly eyes (optional)
*pipe cleaners (optional)

Have your child paint the rocks red.


After those are dry, paint on the head and spots. You can add pipe cleaner antennas or feet. We didn't add eyes, but you can paint white dots on or glue on googly eyes. We have a grandma that loves lady bugs and she might want these in her garden.

Monday, April 20, 2009

Sound Cylinders

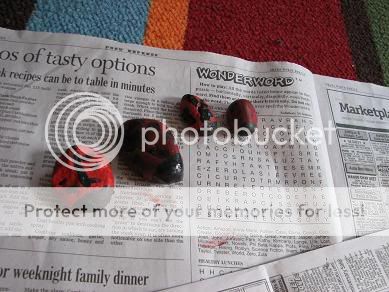
Here is another Montessori inspired lesson called Sound Cylinders. The object of this lesson is to refine the auditory sense. This is my homemade version. Here's what you'll need:
*film canisters
*red and blue construction paper
*things that make different sounds like chick peas, rice, salt, bells, ect.

Most people don't have a bunch of empty film canisters laying around. I went to a place that develops film and asked them for their empty ones. They were happy to give them to me. Ask for at least 8. It's helpful if they're all the same but I didn't want to seem to picky so I just crossed my fingers. I only got one different color. I started off using 8. Cover 4 canisters with blue construction paper and 4 with red construction paper.


Next fill up one red and one blue canister of the same object.


Close the lids. Show your child how to sort the colors and put the reds on one side and the blues on the other in a line. Take one red and bring it up to your ear and shake it. Then choose one blue from the line and shake it. If it's not a match put it back in line. If it is a match put them together to the side. Continue this until they've found all the matches.


After they've mastered those, you can add more sounds. Another activity is lining them up loudest to softest or guessing what's in the container.

Wednesday, April 15, 2009

Smelling Bottles

I got this idea from Montessori. They have an activity called smelling bottles. You can either have the bottles and match them to control cards or you can have 2 sets of bottles. With 2 sets of bottles you have the option of blindfolding your child and see if they can find the scents that smell the same. Here's what you need:
*empty baby food jars, washed
*hammer and a nail
*cotton balls
*miscellaneous extracts (cherry, mint, lemon, banana, cinnamon, orange, ect.)
*stock card

Put the lids on the baby food jars and hammer 5 or so holes in the top.


Then take the lids back off. Next get your cotton balls and put a few drops of extract on each cotton ball and put these in the jar. I just #3 baby food jars and they were a little too big so I used 3 cotton balls in each. Put the lids back on tightly so your child can't get them off. Then you can either print out a picture of the fruit or whatever scent matches the bottles or draw them on card stock. I wrote the word on them too. I would suggest laminating these. You might need to go through them and let your child smell the bottles and tell them what is in it. Since they might not know what coconut or root beer smells like. I have found at least 10 different scents. You could experiment with other things in the bottle like dirt or something other than food extracts. I would suggest covering the bottles with black paper. My daughter automatically sees what color is on the cotton ball and knows which card it goes with. You want them to use their sense of smell.

Monday, April 13, 2009

Know how to knit?

Those of you who know me and my son, know that he is a SLOBBER MONSTER. I'm serious, I go through tons of bibs a day. So I thought, why not make my own bibs? It's cheap and easy! I came across this very simple Baby Bib Pattern. So grab your knitting needles and give it a try. Here's how mine turned out.


I used whatever yarn I had lying around and vintage buttons.

Leftovers

Time to start using those left over hard boiled eggs from Easter. I scrounged this sandwich up one day when I couldn't find anything to eat. Lets call it a Deviled Egg Sandwich. Here's what you need:
*hard boiled eggs
*mayo (I don't like mayonnaise but can eat Light Miracle Whip)
*a dab of mustard
*dill relish or sweet relish
*2 slices of bread, toasted
*paprika

Chop up 1 or 2 hard boiled eggs. Add some mayo, or miracle whip, until it's the consistency you like. Mix in a dab of mustard. I mean just tiny dab. Squirt some relish in there. I say squirt because I buy the plastic bottles of relish :) Then salt to taste. Grab your toast out of the toaster. This makes all the difference. Having the bread toasted makes it so you're not just eating a mush sandwich! Spread on your mixture and sprinkle some paprika on there.

Wednesday, April 8, 2009

Local Entertainment

There is usually a lot of activities, events, story times and exhibits going on in your local area. Here is a website I go to sometimes to see what's going on in my city. Just choose your own location to see what's going on around you. GoCityKids

My kids enjoy the library. It's fun and FREE. Get your child their own library card. It will make them feel special to have a card of their very own. And if your library is like mine, there's no late fee if your child uses their own card. Libraries usually have lots of activities going on like daily readings or special guests. Last summer my daughter went to meet "The Very Hungry Caterpillar"


Now that she's a little older she can sit and look at a book.

Tuesday, April 7, 2009

Mary had a Little Hand

Here's a chance to use that white crayon in the box. Plus, I really like hand print crafts because I like to look back at the old ones and see how much the kids have grown. Here's what you need:
*black or brown construction paper
*white crayon
*googly eyes
*cotton balls, pulled apart
*scissors (optional)

You can either trace your child's hand on the paper or let them do it. Next, you can either cut out the hand print or leave it on the paper. I left my babies on the paper, because his hand was smaller, but cut out Saetia's. If they're cut out they can play with them later. Put some glue on the body of the lamb and stick on some cotton puffs. Let your child add on eyes and a smile.

Marshmallow Bunnines/Bears

Keeping with the Easter/Spring Theme we tried to make marshmallow bunnies. See if yours can turn out better..Here's what you need:
*Pink marshmallows
*mini marshmallows
*mini M&Ms or regular ones cut up
*toothpick, broken in half


First, start off by cutting one marshmallow in half horizontally and cut the other vertically. Then, cut one mini marshmallow vertically and another mini one in fours. Attach the head to the body with a toothpick. Then stick on the rest of the bunny parts. It will be sticky where you cut the marshmallow so you don't need any thing else to help the parts stay in place. Our first attempt looked more like bears. Saetia was confused by that because I kept calling them bunnies.


The second time around I used pink marshmallows and smaller pieces of M&Ms. I couldn't find minis for the life of me. Saetia's is on the left and mine is on the right.


After that I let her loose with some of the left over parts to see what she came up with. And she made street lights. Then of course she had to eat everything ;)

Monday, April 6, 2009

Little Paleontologist

My daughter has been in this dinosaur phase for so long. We saw a dinosaur exhibit at the Omaha Children's Museum and one of the activities was digging for dinosaur bones. They had a big sandbox with giant bones in it. You could unearth the bones and brush them off. I thought I could translate this to a home activity. Here's what you need:
*big plastic tub with a lid
* 20lb bag of rice($5 at walmart)
*little shovels, brushes, funnels or tools(not sharp)
*small dinosaurs, bones, shells, rocks and really anything you could use as a fossil

This is so simple and provides hours of entertainment. Just dump the rice in your box and bury your fossils. Give your child the tools and tell them how to dig up the fossils and brush them off. You can talk about how professionals find bones and make molds of them because they're fragile. Or you can talk about any other type of information relating to paleontology, dinosaurs or fossils. The kids will enjoy just digging in the rice with their hands and tools after they've found all the fossils. And when they're done just put everything in the plastic tub and shut the lid!


Thursday, April 2, 2009

Baby Chicks

Here's an Easter craft that is fun to assemble. You can also give these away to family members or get a small basket with Easter grass and set these little chicks in there and it could be a cute centerpiece. You could use more pastel colors though. Here's what you need:
*pastel craft paint
*styrofoam balls (2in and 1 1/2in)
*googly eyes
*pipe cleaners
*feathers
*something to poke a hole in the styrofoam(i used a skewer)

First, poke a hole down the middle of the big and small styrofoam balls. The hole should be big enough for a double piece of pipe cleaner to fit through. Next, let your child paint the balls.


When those are dry, take your pipe cleaner and fold it in half and twist the folded side around a feather. Slip it through the small ball, then the big ball. Shape the ends into feet. Then you can add googly eyes and small pieces of pipe cleaner for beaks. My daughter wanted to add tails. I said "why not?" Let them be creative.


Saetia wanted to add the photo she took with my phone (she's proud of her chicks)